An IoT thermostat API to connect hvac and temperature APIs
The thermostat API provides controls and logic for the whole thermostat system. This component of an IoT thermostat is what ties everything together: It gets the current temperature from the temperature API, compares it to the desired temperature (and other settings), and computes the next heating and air conditioning state to send to the hvac API. The figure below illustrates the big picture IoT thermostat. Specifically, you can see that the thermostat API is a solely virtual component of the thermostat. It connects to two other APIs that have both virtual and physical interfaces.
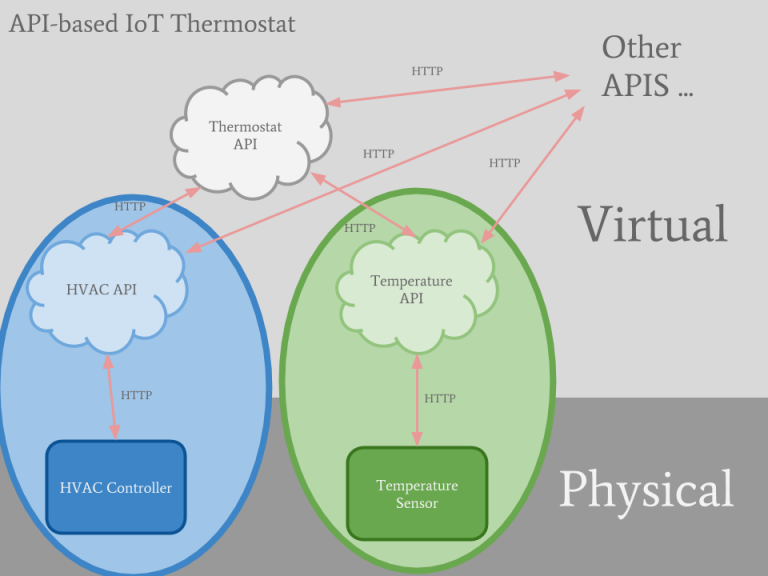
Diagram of IoT Thermostat APIs
API
The REST API for the thermostat has a lot of similarities to both the hvac controller API and temperature sensor API. Below is a brief summary of the API.
Code for API: https://github.com/zbrogz/thermostatAPI
API URL: https://api.zachbrogan.com/thermostat
State
-
- desired_temperature (Number): A number representing what the temperature is set to.
- mode (String): The thermostat can be in one of 5 modes: off, heat, cool, normal, or eco.
- off: The hvac state should be idle (fan, heater, ac all off), regardless of the current or desired temperature.
- heat: Only heat if the temperature is lower than the set temperature; don’t use the ac if the temperature is above the set temperature.
- cool: Only cool if the temperature is higher than the set temperature; don’t use the heater if the temperature is below the set temperature.
- normal: Heat or cool as needed to achieve the desired temperature. (this is the default)
- eco: The economical/ecological mode; only heat or cool to achieve a range of temperatures. This can help to reduce energy costs.
- fan (String): Set to auto or on. Primarily used to manually turn on the fan.
- auto: the fan should be on when heating or cooling, off otherwise.
- on: the fan should always be on.
- eco_min_temperature (Number): The lower bound of the eco mode range of temperatures.
- eco_max_temperature (Number): The upper bound of the eco mode range of temperatures.
- tolerance (Number): Tolerance of desired temperature. Can be used (if needed) to avoid hvac frequently turning on and off.
- area (String): A string indicating the area in the home that the thermostat is responsible for. Ex) “Family Room”
- hvac_url (String): The url for the hvac controller’s API where the updated heating/cooling state is sent to.
- temperature_url (String): The url for the temperature sensor’s API where the current temperature is retrieved.
- uuid (String): A unique ID representing the thermostat.
Example:
{
"desired_temperature": 70,
"temperature_url": "https://api.zachbrogan.com/temperature/6d6f37fbae8947979cd6a95098649875",
"tolerance": 1,
"fan": "auto",
"area": "Main Floor",
"hvac_url": "https://api.zachbrogan.com/hvac/2f3f04053b824a5491b4aa09975277f9",
"mode": "off",
"uuid": "47b42a430c9b4910910d781f454c1147",
"eco_max_temperature": 78,
"eco_min_temperature": 65
}
API Resources & Methods
/thermostat
GET, OPTIONS, POST
/thermostat/{uuid}
GET, OPTIONS, PUT, DELETE
Organization
Like mentioned at the end of the hvac controller API post, the APIs could be implemented pretty much anywhere, but I opted to use Amazon Web Services. The thermostat API uses the following AWS services:
- API Gateway: Routes API HTTP requests to the correct resource, such as lambda functions.
- Lambda: Serverless functions that perform actions, such as accessing a database. The thermostat API has two lambda functions:
- state.py: Manages the thermostat state stored in the database
- updater.py: Retrieves the current temperature and thermostat settings, and computes the next hvac state, which is then sent to the hvac API.
- Dynamodb: A database for storing the thermostat state parameters, such as the desired temperature.
- CloudWatch: A timer for calling the updater lambda every minute.
Deployment
To deploy the thermostat API on AWS using handel, follow the instructions below. You can also find them on my repo.
- Install Node.js: https://nodejs.org/en/
- Install Handel:
npm install -g handel - Install AWS CLI: http://docs.aws.amazon.com/cli/latest/userguide/installing.html
- Configure AWS CLI: http://docs.aws.amazon.com/cli/latest/userguide/cli-chap-getting-started.html
- Clone the thermostatAPI repo:
git clone https://github.com/zbrogz/thermostatAPI.git - Deploy the hvacAPI using handel:
handel deploy -c default-us-west-2 -e dev
Once handel finishes deploying the API, you can find the url to the API:
- Log in to aws.amazon.com
- Go to services –> API Gateway
- Click on the API: thermostatAPI-dev-api-apigateway
- Go to stages
- Copy the URL from ‘Invoke URL’
You can also create a custom url for the API, rather then the url given by Amazon. For example, I have api.zachbrogan.com/thermostat. I will post instructions on how to do this in the future.
0 Comments